GreenDao and single ContentProvider for multiple Entities

When I started working on MusicBee Remote‘s Library Browsing support It became clear that some kind of data store functionality was required that didn’t include ArrayLists of objects in some class running in the memory. This was how the implementation of the Now Playing list worked until now and you could see the usage of the memory skyrocket especially with lists around 10000 tracks.

The first though was to use SQLite and thus some experimentation started. However I soon realized that I would prefer to avoid writing all the CRUD and POJO creation code by hand and maintaining it. However I had already started working with Content Providers, Cursors and CursorLoaders and I wanted a way to combine all these things in an application.

At some point I started playing with GreenDao then I moved to ORMlite, I don’t really remember the exact reason however after some testing my workload I found out that GreenDao requires half the time of ORMLite for the exact same thing. That was reason enough to revert to GreenDao.

Now the problem with the GreenDao generator (at least the currently available version, though it will probably change in future) is that generates one ContentProvider per Entity. This does not suit my need so after some searching on Google and StackOverflow I realized that none of the available solutions was what I was really looking for.

Thus the decision came to me. Why not check how the GreenDao Generator works and try to replicate the functionality but closer to my needs. The initial idea was to create some kind of fork but then I decided against and settled for including my changes in my applications generator Gradle module.

Based on the GreenDao’s ContentProvider template a new implementation was created to suit my needs. A template that creates a single ContentProvider for all the Entities in the Schema. I had to move some parts like CONTENT_URI on a Helper – Contract class. After some work the template took the following form:

package ${contentProvider.javaPackage};

import android.content.ContentValues;
import android.content.UriMatcher;
import android.database.Cursor;
import android.database.sqlite.SQLiteDatabase;
import android.database.sqlite.SQLiteQueryBuilder;
import android.net.Uri;
import android.text.TextUtils;
import com.google.inject.Inject;
import de.greenrobot.dao.DaoLog;
import roboguice.content.RoboContentProvider;

/* Copy this code snippet into your AndroidManifest.xml inside the
<application> element:

<provider
    android:name="${contentProvider.javaPackage}.${contentProvider.className}"
    android:authorities="${contentProvider.authority}"/>
*/

public class ${contentProvider.className} extends RoboContentProvider {

    public static final String AUTHORITY = "${contentProvider.authority}";
    private static final UriMatcher URI_MATCHER;

    static {
        URI_MATCHER = new UriMatcher(UriMatcher.NO_MATCH);
        <#list schema.entities as entity>
        ${entity.className}Helper.addURI(URI_MATCHER);
        </#list>
    }

    @Inject
    private DaoSession daoSession;

    @Override
    public boolean onCreate() {
        DaoLog.d("Content Provider started: " + AUTHORITY);
        return super.onCreate();
    }

    protected SQLiteDatabase getDatabase() {
        if (daoSession == null) {
            throw new IllegalStateException("DaoSession must be set during content provider is active");
        }
        return daoSession.getDatabase();
    }
    <#--
    ##########################################
    ########## Insert ##############
    ##########################################
    -->
    @Override
    public Uri insert(Uri uri, ContentValues values) {
        <#if contentProvider.isReadOnly()>
            throw new UnsupportedOperationException("This content provider is readonly");
        <#else>
        int uriType = URI_MATCHER.match(uri);
        long id;
        String path;
        switch (uriType) {
        <#list schema.entities as entity>
            case ${entity.className}Helper.${entity.className?upper_case}_DIR:
                id = getDatabase().insert(${entity.className}Helper.TABLENAME, null, values);
                path = ${entity.className}Helper.BASE_PATH + "/" + id;
                break;
        </#list>
            default:
                throw new IllegalArgumentException("Unknown URI: " + uri);
            }
            getContext().getContentResolver().notifyChange(uri, null);
            return Uri.parse(path);
        </#if>
        }
    <#--
    ##########################################
    ########## Delete ##############
    ##########################################
    -->

        @Override
        public int delete(Uri uri, String selection, String[] selectionArgs) {
        <#if contentProvider.isReadOnly()>
            throw new UnsupportedOperationException("This content provider is readonly");
        <#else>
            int uriType = URI_MATCHER.match(uri);
            SQLiteDatabase db = getDatabase();
            int rowsDeleted;
            String id;
            switch (uriType) {
            <#list schema.entities as entity>
                case ${entity.className}Helper.${entity.className?upper_case}_DIR:
                    rowsDeleted = db.delete(${entity.className}Helper.TABLENAME, selection, selectionArgs);
                    break;
                case ${entity.className}Helper.${entity.className?upper_case}_ID:
                    id = uri.getLastPathSegment();
                    if (TextUtils.isEmpty(selection)) {
                        rowsDeleted = db.delete(${entity.className}Helper.TABLENAME,
                            ${entity.className}Helper.PK + "=" + id, null);
                    } else {
                        rowsDeleted = db.delete(${entity.className}Helper.TABLENAME,
                            ${entity.className}Helper.PK + "=" + id + " and " + selection, selectionArgs);
                    }
                    break;
            </#list>
                default:
                    throw new IllegalArgumentException("Unknown URI: " + uri);
            }
            getContext().getContentResolver().notifyChange(uri, null);
            return rowsDeleted;
        </#if>
        }

    <#--
    ##########################################
    ########## Update ##############
    ##########################################
    -->
    @Override
    public int update(Uri uri, ContentValues values, String selection,
        String[] selectionArgs) {
        <#if contentProvider.isReadOnly()>
            throw new UnsupportedOperationException("This content provider is readonly");
        <#else>
            int uriType = URI_MATCHER.match(uri);
            SQLiteDatabase db = getDatabase();
            int rowsUpdated;
            String id;
            switch (uriType) {
            <#list schema.entities as entity>
                case ${entity.className}Helper.${entity.className?upper_case}_DIR:
                    rowsUpdated = db.update(${entity.className}Helper.TABLENAME, values, selection, selectionArgs);
                    break;
                case ${entity.className}Helper.${entity.className?upper_case}_ID:
                    id = uri.getLastPathSegment();
                    if (TextUtils.isEmpty(selection)) {
                        rowsUpdated = db.update(${entity.className}Helper.TABLENAME,
                            values, ${entity.className}Helper.PK + "=" + id, null);
                    } else {
                        rowsUpdated = db.update(${entity.className}Helper.TABLENAME,
                            values, ${entity.className}Helper.PK + "=" + id + " and "
                            + selection, selectionArgs);
                    }
                    break;
            </#list>

                default:
                    throw new IllegalArgumentException("Unknown URI: " + uri);
            }
            getContext().getContentResolver().notifyChange(uri, null);
            return rowsUpdated;
        </#if>
    }
    <#--
    ##########################################
    ########## Query ##############
    ##########################################
    -->
    @Override
    public Cursor query(Uri uri, String[] projection, String selection,
        String[] selectionArgs, String sortOrder) {

        SQLiteQueryBuilder queryBuilder = new SQLiteQueryBuilder();
        int uriType = URI_MATCHER.match(uri);
        switch (uriType) {
        <#list schema.entities as entity>
            case ${entity.className}Helper.${entity.className?upper_case}_DIR:
                queryBuilder.setTables(${entity.className}Helper.TABLENAME);
                break;
            case ${entity.className}Helper.${entity.className?upper_case}_ID:
                queryBuilder.setTables(${entity.className}Helper.TABLENAME);
                queryBuilder.appendWhere(${entity.className}Helper.PK + "=" + uri.getLastPathSegment());
                break;
        </#list>
            default:
                throw new IllegalArgumentException("Unknown URI: " + uri);
        }

        SQLiteDatabase db = getDatabase();
        Cursor cursor = queryBuilder.query(db, projection, selection,
        selectionArgs, null, null, sortOrder);
        cursor.setNotificationUri(getContext().getContentResolver(), uri);

        return cursor;
    }

    <#--
    ##########################################
    ########## GetType ##############
    ##########################################
    -->
    @Override
    public final String getType(Uri uri) {
        switch (URI_MATCHER.match(uri)) {
        <#list schema.entities as entity>
            case ${entity.className}Helper.${entity.className?upper_case}_DIR:
                return ${entity.className}Helper.CONTENT_TYPE;
            case ${entity.className}Helper.${entity.className?upper_case}_ID:
                return ${entity.className}Helper.CONTENT_ITEM_TYPE;
        </#list>
            default :
                throw new IllegalArgumentException("Unsupported URI: " + uri);
        }
    }
}

Since I use RoboGuice with MusicBee Remote, I made my class inherit the RoboContentProvider and made the DaoSession injectable. If you want to use it without RoboGuice, just modify the template to inherit the ContentProvider.class instead of RoboContentProvider and change the way the DaoSession is passed in the generated ContentProvider. The original template used static field though according to the comment included it would probably change in the future.

The template is one of the three parts of my implemenation. The second part is the Helper classes that we will check later and finally the HelperGenerator.class.

On a side note, with RoboGuice the DaoSession is provided by a DaoSessionProvider. In the applications module a binding is registered in the configure method.

        bind(DaoSession.class)
                .toProvider(DaoSessionProvider.class)
                .asEagerSingleton();

And this is the DaoSessionProvider.class:

package com.kelsos.mbrc.providers;

import android.content.Context;
import android.database.sqlite.SQLiteDatabase;
import com.google.inject.Inject;
import com.google.inject.Provider;
import com.kelsos.mbrc.dao.DaoMaster;
import com.kelsos.mbrc.dao.DaoSession;

public class DaoSessionProvider implements Provider<DaoSession> {
    @Inject
    private Context mContext;

    @Override
    public DaoSession get() {
        final DaoMaster daoMaster;
        SQLiteDatabase db;
        DaoMaster.DevOpenHelper helper = new DaoMaster.DevOpenHelper(mContext, "lib-db", null);
        db = helper.getWritableDatabase();
        daoMaster = new DaoMaster(db);
        return daoMaster.newSession();
    }
}

The template of the helper class is the following:

package ${entity.javaPackageDao};

import android.database.Cursor;
import android.net.Uri;
import android.content.UriMatcher;
import android.content.ContentResolver;

public final class ${entity.className}Helper {

    private ${entity.className}Helper() { }

    <#list entity.properties as property>
    public static final String ${property.propertyName?upper_case} = ${entity.className}Dao.Properties.${property.propertyName?cap_first}.columnName;
    </#list>

    public static final String TABLENAME = ${entity.classNameDao}.TABLENAME;
    public static final String PK = ${entity.classNameDao}.Properties.${entity.pkProperty.propertyName?cap_first}.columnName;

    <#assign counter = id>
    public static final int ${entity.className?upper_case}_DIR = ${counter};
    public static final int ${entity.className?upper_case}_ID = ${counter+1};

    public static final String BASE_PATH = "${entity.className?lower_case}";
    public static final Uri CONTENT_URI = Uri.parse("content://" + ${contentProvider.className}.AUTHORITY + "/" + BASE_PATH);
    public static final String CONTENT_TYPE = ContentResolver.CURSOR_DIR_BASE_TYPE + "/" + BASE_PATH;
    public static final String CONTENT_ITEM_TYPE = ContentResolver.CURSOR_ITEM_BASE_TYPE + "/" + BASE_PATH;

    public static void addURI(UriMatcher sURIMatcher) {
        sURIMatcher.addURI(${contentProvider.className}.AUTHORITY, BASE_PATH, ${entity.className?upper_case}_DIR);
        sURIMatcher.addURI(${contentProvider.className}.AUTHORITY, BASE_PATH + "/#", ${entity.className?upper_case}_ID);
    }

    public static final String[] PROJECTION = {
    <#list entity.properties as property>
        ${property.propertyName?upper_case}<#if property_has_next>,</#if>
    </#list>
    };

    public static ${entity.className} fromCursor(Cursor data) {
        final ${entity.className} entity = new ${entity.className}();
        <#list entity.properties as property>
        <#if property.propertyType?lower_case == "boolean">
        entity.set${property.propertyName?cap_first}(data.getInt(data.getColumnIndex(${property.propertyName?upper_case})) > 0);
        <#else>
        entity.set${property.propertyName?cap_first}(data.get${property.propertyType?cap_first}(data.getColumnIndex(${property.propertyName?upper_case})));
        </#if>
        </#list>
        return entity;
    }
}

The helpers include information like static string references to the table name, primary key and properties along with the CONTENT_URI and the types of data returned. A String array called PROJECTION is also included. This array is used in the CursorLoader creation like in the following example. Some of the properties already exists in the EntityDao and are repeated here only for ease of access.


To explain what I mean with ease of access let's take the template above. Now imaging that we have a table named "Genre" with a column named "Name". After running the DaoGenerator the column name will be availble under <strong>GenreDao.Properties.Name.columnName</strong> this will be mapped to a String property named <strong>NAME</strong> in the helper class. 


   @Override
    public Loader<Cursor> onCreateLoader(int id, Bundle args) {
		return new CursorLoader(getActivity(), GenreHelper.CONTENT_URI,
				GenreHelper.PROJECTION, null, null, null);
    }

A Cursor loader requests of the Genre CONTENT_URI (contained in the GenreHelper.class, all the fields (PROJECTION).

Each helper also includes a helper method fromCursor(Cursor cursor), the method takes a cursor and creates a new object of the entity the helper is for. The method has absolutely no checks, safeguards for misuse and might raise Exceptions if not used properly. The method requires a Cursor that was created with the Helper.PROJECTION, which means all the columns of the table should exist in the Cursor.

The final part required to generate the ContentProvider and helper methods from the templates is the HelperGenerator.class:

package com.kelsos.mbrc;

import de.greenrobot.daogenerator.ContentProvider;
import de.greenrobot.daogenerator.Entity;
import de.greenrobot.daogenerator.Schema;
import freemarker.template.Configuration;
import freemarker.template.DefaultObjectWrapper;
import freemarker.template.Template;
import freemarker.template.TemplateException;

import java.io.File;
import java.io.FileWriter;
import java.io.IOException;
import java.io.Writer;
import java.util.HashMap;
import java.util.List;
import java.util.Map;

public class HelperGenerator {

	public static final int INCREASE = 3;
	private Template templateHelper;
	private Template templateContentProvider;
	private ContentProvider mProvider;
	private int id;

	public HelperGenerator() throws IOException {
		Configuration config = new Configuration();
		config.setClassForTemplateLoading(this.getClass(), "/");
		config.setObjectWrapper(new DefaultObjectWrapper());

		templateHelper = config.getTemplate("contract.java.ftl");
		templateContentProvider = config.getTemplate("content-provider.java.ftl");
		id = 0;
	}

	public void generateAll(Schema schema, String outDir) {
		long start = System.currentTimeMillis();
		List<Entity> entities = schema.getEntities();

		File outDirFile = null;
		try {
			outDirFile = toFileForceExists(outDir);
		} catch (IOException e) {
			e.printStackTrace();
		}

		mProvider = new ContentProvider(schema, schema.getEntities());
		mProvider.init2ndPass();
		mProvider.setClassName("LibraryProvider");

		for (Entity entity : entities) {
			generateHelpers(schema, entity, outDirFile);
		}

		generateContentProvider(schema, outDirFile);
		long time = System.currentTimeMillis() - start;
		System.out.println("Processed " + entities.size() + " entities in " + time + "ms");
	}

	private void generateHelpers(Schema schema, Entity entity, File outDirFile) {
		Map<String, Object> root = new HashMap<>();
		root.put("schema", schema);
		root.put("entity", entity);
		root.put("contentProvider", mProvider);
		root.put("id", id);
		id  += INCREASE;
		generate(entity.getClassName() + "Helper", outDirFile, root, templateHelper, entity.getJavaPackage());
	}

	@SuppressWarnings("ResultOfMethodCallIgnored")
	private void generate(String className, File outDirFile, Map<String, Object> root, Template template, String javaPackage) {
		try {
			File file = toJavaFilename(outDirFile, javaPackage, className);
			file.getParentFile().mkdirs();
			try (Writer writer = new FileWriter(file)) {
				template.process(root, writer);
				writer.flush();
				System.out.println("Written " + file.getCanonicalPath());
			} catch (TemplateException e) {
				e.printStackTrace();
			}
		} catch (IOException e) {
			e.printStackTrace();
		}
	}

	private void generateContentProvider(Schema schema, File outDirFile) {
		Map<String, Object> root = new HashMap<>();
		root.put("schema", schema);
		root.put("contentProvider", mProvider);
		generate(mProvider.getClassName(), outDirFile, root, templateContentProvider, mProvider.getJavaPackage());
	}

	protected File toJavaFilename(File outDirFile, String javaPackage, String javaClassName) {
		String packageSubPath = javaPackage.replace('.', '/');
		File packagePath = new File(outDirFile, packageSubPath);
		return new File(packagePath, String.format("%s.java", javaClassName));
	}

	protected File toFileForceExists(String filename) throws IOException {
		File file = new File(filename);
		if (!file.exists()) {
			throw new IOException(filename
					+ " does not exist. This check is to prevent accidental file generation into a wrong path.");
		}
		return file;
	}
}

This HelperGenerator works in the same way the DaoGenerator works. It will take a Schema instance and an output directory and it will generate the classes. It should be the same schema and output directory as the one passed in the DaoGenerator since must be in the same directory for everything to work.

	new HelperGenerator().generateAll(schema, outDir);

You can find a working example at GitHub

Please keep in mind that with the current implementation if you try to get Foreign Key objects with GreenDao it will crash with the following exception:


de.greenrobot.dao.DaoException: Entity is detached from DAO context

A DaoSession should be attached to an Entity in order to retrieve foreign key objects.
How to: Gitorious and Sendfile for tarball download with Nginx

On Apache Gitorious uses mod_xsendfile to push the tarballs for download. Unfortunately this is not directly compatible with Nginx because Nginx uses a similar but different implementation.

However the is still a way to make this feature work with Nginx. To do so you first have to edit on of the gitorious controllers to. Assuming that gitorious is installed in /var/www/gitorious/ you have to edit the following file

sudo nano /var/www/gitorious/app/controllers/trees_controller.rb

Once you open the file search for the line

response.headers["X-Sendfile"] = File.join(GitoriousConfig["archive_cache_dir"], real_path)

It is in the function:

set_xsendfile_headers(real_path, user_path, content_type = "application/x-gzip")

and replace with the following:

response.headers["X-Accel-Redirect"] = GitoriousConfig["nginx_sendfile_dir"] + real_path

Save the file and open the gitorious configuration file for editing.

sudo nano /var/www/gitorious/config/gitorious.yml

There you have to add the following line (am not sure the position of the line in the configuration is relevant but you can add the line after the default license line):

nginx_sendfile_dir: "/cache/"

Finally in the nginx virtual host for your gitorious instance you have to add the following line (the alias has to be the archive_cache_dir: from gitorious.yml, let’s suppose you set it to /var/git/tarballs)

location /cache {
alias /var/git/tarballs;
internal;
}

Source: http://pastebin.com/3rAWtNyh

Spell check in Evernote

EvernoteI find Evernote a very useful tool, especially the ability to sync the notes taken in one device with every device you own. If you for example happen to get an idea when on the go, or just before sleep usually your mobile phone is easily accessible, so you can write the idea and save the note. Then when you return to your computer you can sync Evernote and access the note.

When using the mobile version of Evernote the device’s keyboard is responsible for the spell check, but on Microsoft Windows the application has an integrated spell check. Even though it is really useful the integrated spell check has a limited number of languages supported. Now if the language you use is included there is no problem. However you may want to keep notes in a different language that it is not included in the Evernote spell check, like Greek in my case.

It seems that Evernote uses MySpell’s dictionary files, so as long as the language dictionary exists for MySpell then you can also use it with Evernote. My own source for the dictionaries is the Debian Linux package site. Search for myspell-lang (for example el_GR for greek). After you finish downloading the folder you have to extract the contents. You should have an .aff, a .dic file and a read me file. You have to copy the files to the Evernote dictionary folder C:\Program Files (x86)\Evernote\Evernote\Dict on a 64bit version  and C:\Program Files\Evernote\Evernote\Dict on the x86 (32bit) version.

When you copy the files in the Dict folder you have to go to Evernote and enable the spell check for the language you just installed. To do so go to the Menu and select Tools and Options. Then go to the Language tab and find the Spelling group box. Then select the Select preferred languages radio button and along with the English or whichever language is checked, check the language you just installed. After clicking on the OK button you should have spell check on the language you just installed.

Ubuntu 10.10 Server with Gitorious and Redmine

The server Installation

To start go to http://www.ubuntu.com/download/server/download and get the ISO image of ubuntu server 11.10 (64bit or 32bit depending on the architecture of your machine) then either burn the ISO on an empty disk or create a bootable USB Flash drive, using either Linux Live USB creator or any other piece of software of your choice, if your system supports booting from a flash drive.

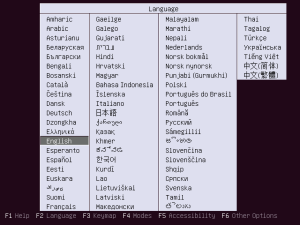
As soon as you boot from the media you will come across the language selection screen, select English and continue.

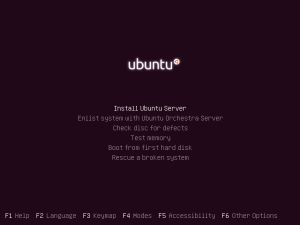
On the next screen select Install Ubuntu Server,

At the next screens you will once again get asked to select a language, choose English. In the Select your Location screen you select the location of your server, this has to do with the time zone.

If you get asked to Configure Locales choose United States – en_US.UTF8 and continue. At the Configure the Keyboard screen select NO and in the Country origin of the Keyboard list go and select English (US). Next in the Keyboard Layout select once again English(US).

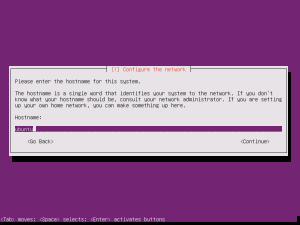
Next in our installation is the network configuration. You will be asked to enter a hostname for the system, you can add a name for the system depending on your network.

Next there will be the Configure the clock screen. You just have to confirm your timezone (It should be the correct since you choose the country previously).

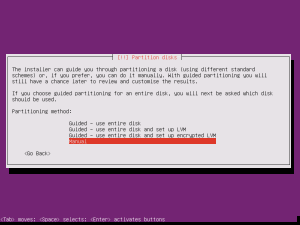
Now we have to partition our disk(s). We will select the manual partitioning.

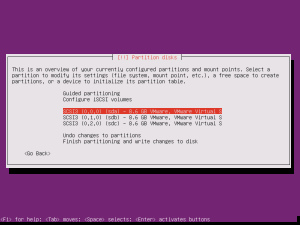
 In our example we have 3 physical drives available. We will configure them using the Logical Volume Manager. Select the physical drive. In ca

If  you get a message saying You have selected an entire device to partition…. select Yes. This will be probably be the same  for every drive. If the drive already has partitions you will have to remove them before proceeding. At some point you should see under the first drive some text saying pri/log DrivesSpace GB FREE SPACE go there and press Enter. On the Partition disks screen select Create a new partition and press enter.

When asked for the New partition size write something around 0.6GB, this will be reserved for the /boot partition, and press continue. The Type for the new partition should be Primary

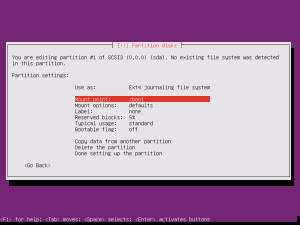
Then you should get across the following: Select the Use as: line, press enter and Select on the menu the Ext4 journaling filesystem, on the Mount Point select /boot and set the bootable flag to on. Then go to Done Setting up the partition to finish with the boot partition.

After finishing with the /boot partition there should be a line under the first drive looking like this #1 primary 600.0 MB f  ext4 /boot and the line containing the word FREE SPACE should be right under this. You also have to create Empty Partitions for every single drive you want to use for the Volume Group.

At this point you should go to the option saying Configure the Logical Volume Manager. In the screen with the Summary of current LVM configuration all the values should be zero. On the LVM configuration action: you should create the Create volume group. Give a name to the volume group, something like server_vg.

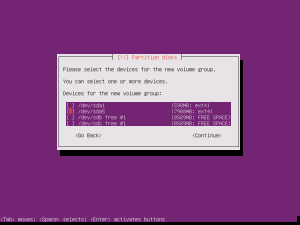
When you get asked to select the devices for the new volume group. Select the other drives along with the empty space in the first drive.

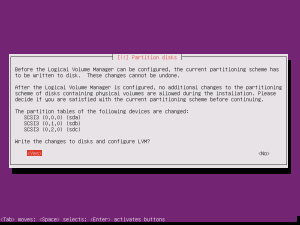
After selecting the drives you can continue. the new volume group should contain all your drives. Write the changes and continue.

At this point the summary of the LVM configuration should have 3 Used physical volumes and one Volume Group. The next step is to create logical volumes inside the server_vg or whatever is the name you choose. Select Create logical volume, then select the volume group.

At this point you will get asked for the name of the Logical volume, generally I use as a name for each volume the name of the Mount point that will used for the volume.

The first logical volume will be used for the swap partition. So I will name it swap. When asked for the Logical Volume size use 1.5 times the amount of the server’s RAM.

Then you have to create Logical volumes for at least root(/) and (/home),  I used about 10GB for the root logical volume of my server and the rest for /home.

I also used a separate logical volume for /var, to keep it separate from the root partition, because there resides the web root folder, along with my git repositories etc. For the /var partition I used 20GB.

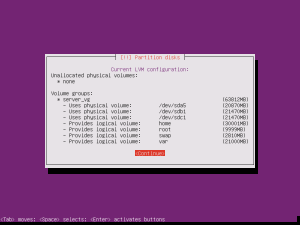
So we have the following: swap – 1.5*RAM, root – 10GB, var – 20GB and home – the rest of the available space.

At the end of the creation of the logical volumes if you choose Display configuration details as an LVM configuration action you should get a screen that looks like the following.

At this point select Finish, that should take you back to the overview of partitions and mount points. There you should now see the Logical Volumes above the physical ones. At this point we have to format the partitions – logical volumes and assign mount points like we did with the boot partition. To do so go to the numbered entry underneath each volume and press enter. At the Use as: you have to select Ext4 Journaling file system for every single partition except the Swap (for swap it should be swap area). Remember we have named each logical volume after the mount point it is going to host. So it will be easy to select mount points for each volume. /home is for the home volume, / is for the root one, /var for the var. After finishing with the setting for each partition you should select Done setting up the partition to return to the overview.

When you are done with every single partition select Finish partitioning and write changes to disk, to continue. You will then be asked to write the changes to disk, select Yes and continue.

At this point the installation of the base system will start. When that finishes you will asked to create a new user. First you will be asked for the Fullname, then the username, then the password (twice). You will also be asked if you want to encrypt you home directory, that’s up to you, I usually leave it unencrypted. Then it is the proxy configuration, probably you will have to leave it blank and continue.

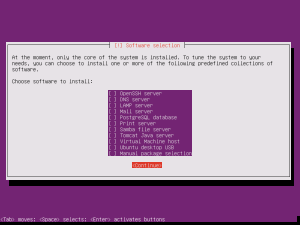
After a while you will get asked how you want to manage upgrades on the system. I usually prefer to do the updates on my own, so I prefer No automatic updates. Then will be prompted to select software to be installed, installed, ignore every single option and continue we will install everything needed on our own.

When you get prompted for the GRUB installation select Yes, to install the boot loader to the Master Boot Record. At this point you should get an Installation complete message. Remove the installation media and press Continue. The system should reboot at this point.

After the boot process is finished you will be presented with the login prompt, use your username and password to login.

At this point you should first do the following to update the installation to the latest packages.

sudo apt-get update
sudo apt-get upgrade

At this point we are going to install the OpenSSH Server in order to have shell access to our server.

sudo apt-get install ssh

After the installation of the OpenSSH server we have to edit the ssh daemon’s configuration file and change the Port from 22 (the default ssh port) to some other port of our selection. This is done for security reasons. This way you will avoid lot’s of automated brute force attacks that target the default ssh port.

sudo nano /etc/ssh/sshd_config

Now it’s time to restart the sshd to do so.

sudo /etc/init.d/ssh restart

At this point you should be able to connect to the server from another machine using an ssh client (on windows I prefer using Putty).

Installing Apache, MySQL and phpMyAdmin

To install the apache webserver we have to run the following:

sudo apt-get install apache2

After this we have to install php5:

sudo apt-get install php5 libapache2-mod-php5

and then we install the mysql server:

sudo apt-get install mysql-server

During the installation you will be asked to provide the password for the root user of the database. This password is the administrative password for the MySQL database. You will need it for the administration of the MySQL installation, like creating new users/tables editing privileges etc.

After this we are gonna install phpMyAdmin for the easy management of the database.

sudo apt-get install libapache2-mod-auth-mysql php5-mysql phpmyadmin

At some point during the installation you will get asked for the automatic configuration of phpMyAdmin. During this you will have to use the MySQL root (administrative user) password to allow the installer to configure automatically phpMyAdmin. After this you will also get asked for a password for the phpMyAdmin administrative user.

Dynamic IP and Dynamic-DNS

If you use a dynamic dns service like DynDNS or no-ip, with the free service you can get up to two different hostnames per account. Since gitorious needs its own hostname you can use own for gitorious and the second one for a normal site that will also host redmine as a sub-uri  and phpmyadmin etc. If you use a router with DD-WRT or running INADYN on the server it self you can configure it to update the two hostnames to your connection’s IP.

To do so in DD-WRT you have to go to Setup then DDNS there add you username – password and in the Host Name field add the following “hostname1 – a hostname2“, now DD-WRT should update both the hostnames with your IP every time it changes. With the usage of the virtual hosts in apache you you can now use the hostname1 for redmine, phpmyadmin, and the website and hostname2 for gitorious.

Preparing for Gitorious – Installing Git System and Various Essentials

First we have to install the git related packages, to do so we have to run the following command:

sudo apt-get install git-core git-svn

After this we are gonna install the MySQL client along with the development libraries. We are gonna need these for the Gitorious installation later.

sudo apt-get install mysql-client libmysqlclient-dev

All the following packages are gonna be needed at some point during the Gitorious installations so we are gonna install them all before starting the installation.

sudo apt-get install apg build-essential libpcre3 libpcre3-dev postfix make zlib1g zlib1g-dev
sudo apt-get install libonig-dev libyaml-dev geoip-bin libgeoip-dev libgeoip1
sudo apt-get install imagemagick libmagickwand-dev libmagick++-dev zip unzip
sudo apt-get install libxslt-dev libxml2-dev
sudo apt-get install libssl0.9.8
sudo apt-get install libcurl4-openssl-dev libssl-dev apache2-prefork-dev libapr1-dev libaprutil1-dev
sudo apt-get install uuid uuid-dev openjdk-6-jre

Afterwards we will install memcached and add it to the default running services of our server.

sudo apt-get install memcached
sudo update-rc.d memcached defaults

Gitorious setup and configuration.

Ruby Enterprise Edition

At this point we have to get and install the Ruby Enterprise Edition (REE).

Before we start with the installation we are going to create a folder inside our home folder. There we are going to download and unzip all the resources need in this guide.

cd ~/
mkdir tmp
cd tmp

Since we are already inside the temporary directory now we can go to the website of REE and get the latest version. At the point of this installation the latest edition was v1.8.7-2011.03.

To download REE we have to go to the terminal, and download the latest version (get the URL from the download site) using wget.

wget http://rubyenterpriseedition.googlecode.com/files/ruby-enterprise_1.8.7-2011.03_amd64_ubuntu10.04.deb

In order to install REE we have to use dpkg,

sudo dpkg -i ruby-enterprise_1.8.7-2011.03_amd64_ubuntu10.04.deb

In case you downloaded a different, newer version just replace the filename with that of the one you downloaded.

After installing REE you have to append a few lines at the bottom of the /etc/profile file. In order to do so you have to open /etc/profile with an editor (I am gonna use nano) having administrative privilegdes,

sudo nano /etc/profile

and append the following,

export PATH=/usr/local/bin:$PATH
export LD_LIBRARY_PATH="/usr/local/lib"
export LDFLAGS="-L/usr/local/lib -Wl,-rpath,/usr/local/lib"

Afterwards we have also to prepend the following to the /etc/ld/so.conf file.

sudo nano /etc/ld.so.conf

to open the file and then add to the top of the file the following:

/usr/local/lib
include ld.so.conf.d/*.conf

The next step after this is to run the following:

sudo su
source /etc/profile
sudo ldconfig

Ruby Gems Installation

At this point we are going to get and install Ruby gems. For this we will use again the temporary directory we created before.

cd ~/tmp
wget http://rubyforge.org/frs/download.php/73882/rubygems-1.4.2.tgz
tar xvzf rubygems-1.4.2.tgz
cd rubygems-1.4.2
sudo ruby setup.rb

The following gems will be needed for Gitorious so we are gonna install them,

sudo gem install --no-ri --no-rdoc -v 0.8.7 rake
sudo gem install --no-ri --no-rdoc -v 1.1.0 daemons
sudo gem install -b --no-ri --no-rdoc rmagick passenger bundler

Sphinx Search Server Installation

After this we are gonna install the sphinx search server. If you check the website, the recommended version is the Beta of v2.0 or generally some newer version, but we are gonna use version 0.9.9 because that’s the one used in every guide, and it seems to be working fine. (To be honest I didn’t test the system using a newer version so I have no idea if it is working or not). (before downloading the file change in the tmp folder cd ~/tmp).

wget http://sphinxsearch.com/files/sphinx-0.9.9.tar.gz
tar xvfz sphinx-0.9.9.tar.gz
cd sphinx-0.9.9/
./configure --prefix=/usr
make
sudo make install

Install Apache ActiveMQ

If you check the various guides on the net you will find out that many use as an alternative the stompserver. In our case we will use the Apache ActiveMQ as the messaging system.

Visit the ActiveMQ download page and search for the latest version. Go in the tmp folder we created (cd ~/tmp), copy the url and go to the terminal. There you have to:

wget ftp://ftp.cc.uoc.gr/mirrors/apache//activemq/apache-activemq/5.5.1/apache-activemq-5.5.1-bin.tar.gz
sudo tar xzvf apache-activemq-5.5.1-bin.tar.gz -C /usr/local/
sudo sh -c 'echo "export ACTIVEMQ_HOME=/usr/local/apache-activemq-5.5.1"  >> /etc/activemq.conf'
sudo sh -c 'echo "export JAVA_HOME=/usr/" >> /etc/activemq.conf'
sudo chown -R activemq /usr/local/apache-activemq-5.5.1/data

After this you will have to edit the ActiveMQ configuration xml to prepare it for our Gitorious Installation. To do so:

sudo nano /usr/local/apache-activemq-5.5.1/conf/activemq.xml

Inside the xml file find the <transportConnectors> tags and add the following line inside:

<transportConnector name="stomp" uri="stomp://0.0.0.0:61613"/>

Then we have to create a symbolic link of the ActiveMQ init script inside the /etc/init.d:

sudo ln -sf /usr/local/apache-activemq-5.5.1/bin/activemq /etc/init.d/

Make it executable:

sudo chmod +x /etc/init.d/activemq

And finally add it to to the services with default priority so it starts when the machine starts.

sudo update-rc.d activemq defaults

Getting and configuring Gitorious

First we have to create the folder that will host the Gitorious installation inside the /var/www

sudo mkdir -p /var/www/gitorious

After this we have to create a new user for git. To do so:

sudo adduser --system --home /var/www/gitorious/ --no-create-home --group --shell /bin/bash git

At this point we will clone the gitorious repository to the folder we previously created.

sudo git clone git://gitorious.org/gitorious/mainline.git /var/www/gitorious

Then we have to give the ownership of the gitorious folder to the git user and then change the rights to the directory.

sudo chown git:git /var/www/gitorious/

sudo chmod -R g+sw /var/www/gitorious/

Afterwards we have to go to the gitorious directory:

cd /var/www/gitorious/

And then run the following:

sudo git submodule init
sudo git submodule update

Then we have to create a symbolic link of the gitorious in the binary path:

sudo ln -s /var/www/gitorious/script/gitorious /usr/bin

Then we have to create some folders inside the gitorious folder, and change the rights:

sudo mkdir -p tmp/pids
sudo chmod ug+x script/*
sudo chmod -R g+w config/ log/ public/ tmp/

Configuring the rest of the services

First we have to edit the git-daemon init script:

sudo nano /var/www/gitorious/doc/templates/ubuntu/git-daemon

In the file search for the line that starts with RUBY_HOME= and change it’s existing value, if it has one with the your ruby installation path. If you installed ruby enterprise edition as suggested, from the .deb package then it is probably in /usr/local.

RUBY_HOME="/usr/local"

You have to do the same for the git-poller script, it is in the same directory as the git-daemon.

Then we have to create the symbolic links of the following scripts in the /etc/init.d/

sudo ln -s /var/www/gitorious/doc/templates/ubuntu/git-ultrasphinx /etc/init.d/git-ultrasphinx
sudo ln -s /var/www/gitorious/doc/templates/ubuntu/git-daemon /etc/init.d/git-daemon
sudo ln -s /var/www/gitorious/doc/templates/ubuntu/git-poller /etc/init.d/git-poller

Next we have to make the scripts executable.

sudo chmod +x /etc/init.d/git-ultrasphinx
sudo chmod +x /etc/init.d/git-daemon
sudo chmod +x /etc/init.d/git-poller

And then we have to add them to the services with default priority.

sudo update-rc.d git-ultrasphinx defaults
sudo update-rc.d git-daemon defaults
sudo update-rc.d git-poller defaults

Next we have to get in the gitorious folder and  install the bundle:

cd /var/www/gitorious/
sudo bundle install

Afterwards we have to create the directories that will host the git repositories along with the tarballs for gitorious and give the ownership to git (user/group).

sudo mkdir /var/git
cd /var/git
sudo mkdir repositories
sudo mkdir tarballs
sudo mkdir tarballs-work</pre>
sudo chown -R git:git /var/git/

Check the ownership of the gitorious folder, if the owner is not the git and the git group then

sudo chown -R git:git /var/www/gitorious/

Preparing for the SSH authentication

Then we have to prepare the server for the SSH authentication. To do so we have to get logged in as the git user.

sudo su git
mkdir ~/.ssh
chmod 700 ~/.ssh
touch ~/.ssh/authorized_keys
chmod 600 .ssh/authorized_keys

Configuring Gitorious

Next we have to configure Gitorious itself. I supposed you are still logged as the git user, if not do so (sudo su git).

Go in the Gitorious home directory (cd ~/) and copy the sample configuration files to create the new configurations files.

cp config/database.sample.yml config/database.yml
cp config/gitorious.sample.yml config/gitorious.yml
cp config/broker.yml.example config/broker.yml

The next step will be to edit the config/gitorious.yml file, but before doing so we have to use apg -m 64 on the terminal in order to create the cookie secret code. Copy the generated code to some text editor and remove the newlines, so it will be a single line string.

Now we can proceed with the file editing. To so use nano config/gitorious.yml (Remember you should be logged as git and in the user’s home directory).

Once inside the gitorioys.yml configuration file, you have to search for the line that starts with the production: string. This is the section of the configuration file that interests us.

In gitorious_host: you should put the host name used for your gitorious instance eg. gitorious.example.com

Note: The repository paths should be in /var/git we created previously so there will be no need to edit it in the configuration file, unless you decided to change the path.

In cookie_secret: you will have to paste the output of the apg -m 64 command you kept in the text editor previously.

Next you have to go to the is_gitorious_dot_org: false line. Uncomment it and make sure it is false. Also if you don’t want your repositories to be available to public you have to uncomment the public_mode: false, if it is not false you will have to make it. You can also search through the configuration file and find if you want to change any other options, they are pretty much well commented so you will have no trouble figuring out what each one does. You can also remove or comment the whole test: section.

The next step will be the to create and migrate the database. Before we do anything at all we have to create the gitorious user and the related table in our database. Most people prefer to do so through the terminal in their guides, if you want to do so you can follow one of the links in the end to find how to do so, if you don’t already know. My own approach will be using phpMyAdmin.

Go to the phpMyAdmin page (it should be something like hostname/phpmyadmin or serverip/phpmyadmin). Log in and then go to the tab Priviledges. Once in there click on the Add new User option.

In the field User Name: you should put gitorious, in the Host: field you have to select localhost and generate a random password. Keep the generated password noted somewhere because we are going to need it in the database.yml configuration file. Then find the Database for user section and select Create database with same name and grant all privileges. Finally click on the create user button to create our new database user.

Now we have to return to the terminal and open the database.yml configuration file for editing (nano config/database.yml). Once open search for the production: section and edit it so it looks like this:

production:
  adapter: mysql
  database: gitorious
  username: gitorious
  password: the password we kept previously
  host: localhost
  encoding: utf8

Now we can finally exit from the git user (just type exit and you should be back to your normal user). Then change to the gitorious folder (cd /var/www/gitorious) once there run the following:

sudo rake db:setup RAILS_ENV=production

Then we have to create the administrative user for gitorious.

sudo env RAILS_ENV=production ruby script/create_admin

As soon as we create the administrative user we have to get the ultrasphinx running. To do so we have to run the following (we should be in the /var/www/gitorious):

rake ultrasphinx:bootstrap RAILS_ENV=production

If you by any case get the following error:

ERROR: index 'main': sql_range_query: Unknown column 'base_tags.name' in 'field list'

You have to got to app/models/project.rb and replace the following,

s.collect(:name, :from => “ActsAsTaggableOn::Tag”, :as => “category”

with this,

s.collect(‘tags.name’, :as => “category”

Also there is a chance that you will also get a message about the “address” being deprecated. In that case you will have to do the following,

sudo nano config/ultrasphinx/default.base

In the default.base search for the searchhd text and replace the word address with listen. After this the bootstrap command should run without issues.

Then we have to change the rights for a few folders and files (some of the folders there should already have the proper rights).

sudo chmod -R g+w config/environment.rb script/poller log tmp
sudo chmod ug+x script/poller

Then we have to add a cron job for ultrasphinx. To do so we have to type sudo crontab -e and add inside the following,

* * * * * cd /var/www/gitorious &&/usr/local/bin/rake ultrasphinx:index RAILS_ENV=production

Configuring Logrotate

Go inside the gitorious directory (cd /var/www/gitorious) and copy the logrotate template and make it executable,

sudo cp doc/templates/ubuntu/gitorious-logrotate /etc/logrotate.d/gitorious
sudo chmod +x /etc/logrotate.d/gitorious

Install the Passenger module

Now we have to install the apache passenger module to do so:

sudo passenger-install-apache2-module

At some point the passenger installation will generate something like the following,

Please edit your Apache configuration file, and add these lines:
   LoadModule passenger_module /usr/local/lib/ruby/gems/1.8/gems/passenger-3.0.9/ext/apache2/mod_passenger.so
   PassengerRoot /usr/local/lib/ruby/gems/1.8/gems/passenger-3.0.9
   PassengerRuby /usr/local/bin/ruby

Keep it noted for a moment because we will need it for the passenger module configuration files.

First we are going to create the .conf file, to do so type sudo nano /etc/apache2/mods-available/passenger.conf. Inside the empty file add the PassengerRoot and PassengerRuby lines and save the file. It should look something like the following,

PassengerRoot /usr/local/lib/ruby/gems/1.8/gems/passenger-3.0.9
 PassengerRuby /usr/local/bin/ruby

Then we are going to create the .load file, to do so type sudo nano /etc/apache2/mods-available/passenger.load. Inside the empty file we should add the LoadModule line. It should look something like the following,

LoadModule passenger_module /usr/local/lib/ruby/gems/1.8/gems/passenger-3.0.9/ext/apache2/mod_passenger.so

Note: the paths or the versions may differ so adjust accordingly.

Also at this point we will also install the xsendfile mod for apache.

sudo apt-get install libapache2-mod-xsendfile

Check the xsendfile mod version and keep it noted for the virtual host configuration.

dpkg -l | grep libapache2-mod-xsendfile

Then we have to enable some apache modules:

sudo a2enmod rewrite
sudo a2enmod deflate
sudo a2enmod passenger
sudo a2enmod expires
sudo a2enmod ssl
sudo a2enmod xsendfile

At this points we have to disable the default apache site if it is enabled,

a2dissite default

and then restart apache sudo /etc/init.d/apache restart.

Then we have to append the following to ~/.bashrc as the git user (sudo su git).

#User specific aliases and functions
export RUBY_HOME=/usr/local
export GEM_HOME=$RUBY_HOME/lib/ruby/gems/1.8/gems

Finally we have the apache configuration for gitorious. We will start with the configuration for the port 80. Type in the terminal sudo nano /etc/apache2/sites-available/gitorious. In the empty file created add something that looks like the following,

<VirtualHost *:80>
   ServerName gitorious.example.org
   DocumentRoot /var/www/gitorious/public
   ErrorLog /var/www/gitorious/log/gitorious-error.log
   CustomLog /var/www/gitorious/log/gitorious-access.log combined
   <IfModule mod_xsendfile.c>
     XSendFile on
     XSendFilePath /var/git
   </IfModule>
</VirtualHost>

If the version of xsendfile mod is <0.10 you have to use the following instead in the IfModule mod_xsendfile.c tags.

 <IfModule mod_xsendfile.c>
    XSendFile on
    XSendFileAllowAbove on
 </IfModule>

Now we can activate the the gitorious site with the command a2ensite gitorious.

Then we have to create the apache configuration for the port 443 (the SSL connection) to do so go type sudo nano /etc/apache2/sites-available/gitorious-ssl. In the empty file created you have to add something that looks like the following

<IfModule mod_ssl.c>
<VirtualHost *:443>
        ServerName gitorious.example.org
        DocumentRoot /var/www/gitorious/public
        ErrorLog /var/www/gitorious/log/gitorious-ssl-error.log
        CustomLog /var/www/gitorious/log/gitorious-ssl-access.log combined

        <IfModule mod_xsendfile.c>
            XSendFile on
            XSendFilePath /var/git
        </IfModule>

	#   SSL Engine Switch:
        #   Enable/Disable SSL for this virtual host.
        SSLEngine on

        #   A self-signed (snakeoil) certificate can be created by installing
        #   the ssl-cert package. See
        #   /usr/share/doc/apache2.2-common/README.Debian.gz for more info.
        #   If both key and certificate are stored in the same file, only the
        #   SSLCertificateFile directive is needed.
        SSLCertificateFile    /etc/ssl/certs/ssl-cert-snakeoil.pem
        SSLCertificateKeyFile /etc/ssl/private/ssl-cert-snakeoil.key

        #   SSL Protocol Adjustments:
        #   The safe and default but still SSL/TLS standard compliant shutdown
        #   approach is that mod_ssl sends the close notify alert but doesn't wait for
        #   the close notify alert from client. When you need a different shutdown
        #   approach you can use one of the following variables:
        #   o ssl-unclean-shutdown:
        #     This forces an unclean shutdown when the connection is closed, i.e. no
        #     SSL close notify alert is send or allowed to received.  This violates
        #     the SSL/TLS standard but is needed for some brain-dead browsers. Use
        #     this when you receive I/O errors because of the standard approach where
        #     mod_ssl sends the close notify alert.
        #   o ssl-accurate-shutdown:
        #     This forces an accurate shutdown when the connection is closed, i.e. a
        #     SSL close notify alert is send and mod_ssl waits for the close notify
        #     alert of the client. This is 100% SSL/TLS standard compliant, but in
        #     practice often causes hanging connections with brain-dead browsers. Use
        #     this only for browsers where you know that their SSL implementation
        #     works correctly.
        #   Notice: Most problems of broken clients are also related to the HTTP
        #   keep-alive facility, so you usually additionally want to disable
        #   keep-alive for those clients, too. Use variable "nokeepalive" for this.
        #   Similarly, one has to force some clients to use HTTP/1.0 to workaround
        #   their broken HTTP/1.1 implementation. Use variables "downgrade-1.0" and
        #   "force-response-1.0" for this.
        BrowserMatch "MSIE [2-6]" \
                nokeepalive ssl-unclean-shutdown \
                downgrade-1.0 force-response-1.0
        # MSIE 7 and newer should be able to use keepalive
        BrowserMatch "MSIE [17-9]" ssl-unclean-shutdown

</VirtualHost>
</IfModule>

After saving the file you can activate the gitorious ssl site by typing a2ensite gitorious-ssl then you have to restart apache in order to load the new configuration with /etc/init.d/apache2 restart.

At this point you may also want to disable the password access for the git user, to do so type sudo nano /etc/ssh/sshd_config and add the following line at the end of the file:

Match User git
 PasswordAuthentication no

Then  you can reload the SSH configuration with sudo /etc/init.d/ssh reload. Now the git user should be accessible only by using public-private key combinations.

Installing Redmine

Previously in the guide we created a tmp folder in the home folder, if you kept the directory change in it cd ~/tmp (if you deleted or just started the guide from this point you can create it before changing in it by mkdir ~/tmp). After changing in the tmp folder you can open your browser and go to RubyForge to find the link to the latest version of redmine. In my case the latest version was the 1.2.1. Copy the link location and then go to the terminal type the wget command and paste it after the command. After downloading the file un-tar it and go in the redmine folder.

wget http://rubyforge.org/frs/download.php/75097/redmine-1.2.1.tar.gz
tar -xvzf redmine-1.2.1.tar.gz
cd redmine-1.2.1/

At this point we have to create the redmine user in the database.

Go to the phpMyAdmin page (it should be something like hostname/phpmyadmin or serverip/phpmyadmin). Log in and then go to the tab Priviledges. Once in there click on the Add new User option.

In the field User Name: you should put redmine, in the Host: field you have to select localhost and generate a random password. Keep the generated password noted somewhere because we are going to need it. Then find the Database for user section and select Create database with same name and grant all privileges. Finally click on the create user button to create our new database user.

Then we have to copy the example configuration file in order to create the database.yml file.

cp config/database.yml.example config/database.yml

And then we have to edit the new database configuration file so it looks like this,

production:
  adapter: mysql
  database: redmine
  host: localhost
  username: redmine
  password: The randomly generated password for the redmine user
  encoding: utf8

At this point we are gonna install the needed gems for redmine to run properly, so you have to install,

sudo gem install --no-ri --no-rdoc -v=0.4.2 i18n
sudo gem install --no-ri --no-rdoc -v=1.1.0 rack

Next we have to move the redmine folder inside /opt, to do so:

sudo mkdir /opt/redmine
cd /opt/redmine
sudo cp -r ~/tmp/redmine-1.2.1 .

Then get inside the new redmine directory it should be /opt/redmine/redmine-1.2.1 and run the following to generate the session store, migrate the database and load the default data.

rake generate_session_store
sudo RAILS_ENV=production rake db:migrate
sudo RAILS_ENV=production rake redmine:load_default_data

During the default data loading if you get asked for a language, accept the default language (English). Then we have to change ownership on a few folders in the redmine folder, and change the rights on a few more.

sudo chown -R www-data:www-data files log tmp public/plugin_assets
sudo chmod -R 755 files log tmp public/plugin_assets

The passenger module should already be loaded since we installed Gitorious previously.

Now we have to configure the virtual host for redmine. I have to note at this point that Redmine will be configured in the hostname with the phpmyadmin etc.

In the virtual host configuration you have to add the following lines:

PassengerAppRoot /opt/redmine/redmine-1.2/
RailsBaseURI /redmine
RailsEnv production

Then we have to create a symbolic link for redmine public directory in the webroot of the hostname that hosts everything other than gitorious, supposing that the webroot /var/www/ then you have to:

sudo ln -s /opt/redmine/redmine-1.2.1/public /var/www/redmine

We also have to edit the passenger.conf file and add the following line:

PassengerDefaultUser www-data

If you use Eclipse as an IDE for development you may also want to install in the redmine installation the plugin for the Eclipse MyLyn integration. To do so you have to get in the redmine directory and execute the following:

sudo ruby script/plugin install git://redmin-mylyncon.git.sourceforge.net/gitroot/redmin-mylyncon/redmine-mylyn-connector

In case you get at some point the the following warning due to having two virtual hosts for port 443 on the same server,

[warn] _default_ VirtualHost overlap on port 443, the first has precedence

you have to edit the ports.conf file, sudo nano /etc/apache2/ports.conf, go inside the <IfModule mod_ssl.c>tags and add NameVirtualHost *:443 above the Listen 443 line, then save the file.

Resources Used

http://www.howtoforge.com/ubuntu_lamp_for_newbies
http://cjohansen.no/en/ruby/setting_up_gitorious_on_your_own_server
http://coding-journal.com/installing-gitorious-on-ubuntu-11-04/
http://www.gitorious.org/gitorious/pages/UbuntuInstallation
http://www.silly-science.co.uk/2010/12/12/installing-gitorious-on-ubuntu-10-04-howto/
http://www.samontab.com/web/2011/04/how-to-install-redmine-1-1-2-on-ubuntu-server-10-04/

Redmine SUB-URI and Apache configuration

While trying to setup Redmine in a sub-uri I run across an issue will trying to setup apache. Passenger would display the following error: No such file or directory – config/environment.rb while trying to access the Redmine webpage.

After trying a few suggestions on the issue I managed to get Redmine to work with the following configuration:

The passenger.load configuration file was the following (the paths will probably vary depending on the installation):

LoadModule passenger_module /opt/ruby-enterprise-1.8.7-2011.03/lib/ruby/gems/1.8/gems/passenger-3.0.9/ext/apache2/mod_passenger.so
PassengerRoot /opt/ruby-enterprise-1.8.7-2011.03/lib/ruby/gems/1.8/gems/passenger-3.0.9
PassengerRuby /opt/ruby-enterprise-1.8.7-2011.03/bin/ruby
PassengerDefaultUser www-data

In the Virtual Host configuration I added the following:

        PassengerAppRoot /usr/local/lib/redmine-1.2/
        RailsBaseURI /redmine
        RailsEnv production

PassengerAppRoot represents the path that redmine is installed.
RailsBasedURI represents the sub directory in the URL that represents Redmine eg. http://www.example.org/redmine

(for this to work is also essential to have a symbolic link of the redmine-*.*/public inside the web root folder).

Also I changed ownership of the redmine-1.2 folder and the symlink redmine folder to the apache user/group (I am under the impression that it was necessary).

Use Resource files with Eclipse and wxWidgets

While developing with Eclipse  C++ CDT and wxWidgets & MinGW I run along an issue. In Windows wxWidgets requires an MS resource (.rc) file to be compiled along with the project. The file contains the location to the application icon along with an include to the wx resource file. One issue I came across when compiling without including the Resource file to the binary was the rendering of the toolbar. The application would render the toolbar in Windows 95 style.

The resource file content looks like the following:

aaaa ICON "wx/msw/std.ico"

#include "wx/msw/wx.rc"

In order to include the resource file in the binary you first have to use Windres (Windres should be in the PATH system variable as a part of the MinGW suite) through the command prompt:

windres --use-temp-file -isample.rc -osample_rc.o -Iincludepath

You have to replace includepath with the path to the wxWidgets header folder (parent of the wx folder which contains the msw folder).

After you successfully compile the resource file you have to go to Eclipse, right click on the project and open Properties. Once there go to C/C++ Build, and then choose Settings, then go to MinGW C++ linker, and select Miscellaneous. Then go to Other Objects and add the sample_rc.o file. After this you are done and the sample_rc.o should be part of the binary. If you kept the default wxWidgets Resource file, like above you should see the application icon being the default wxWidgets Icon. Also the toolbar should have the proper style, and not the Windows 95 one.

Changing author in git

While transferring my code repositories from SVN to git, I completely forgot to change the author name in the commits, so the wrong user appeared. I could possibly just reconvert the svn repository to git to fix the issue but since I have been trying to merge the the SVN generated git with a new git that was the continuation of the last SVN checkout, when I succeeded I didn’t want to go through all that process again. Luckily I found the following post “How to change the author in git“.

The following code is taken from the source specified above:

git filter-branch --commit-filter '
        if [ "$GIT_COMMITTER_NAME" = "Wrong Commiter Name" ];
        then
                GIT_COMMITTER_NAME="Right Commiter Name";
                GIT_AUTHOR_NAME="Right Commiter Name";
                GIT_COMMITTER_EMAIL="right@email.com";
                GIT_AUTHOR_EMAIL="right@email.com";
                git commit-tree "$@";
        else
                git commit-tree "$@";
        fi' HEAD

Skype Now Playing Plugin for MusicBee

Here is a simple now Skype Now playing plugin I created for MusicBee using C#.

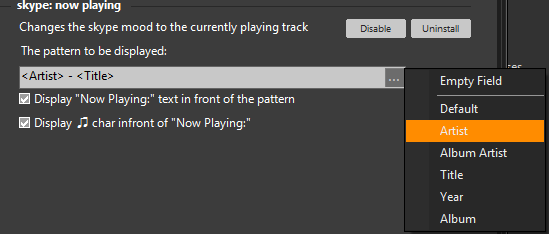
The settings panel of the plugin looks like the following screenshot.

The tags supported at the moment are <Artist>, <AlbumArtist>, <Title>, <Year> and <Album> and they have to be like above in the textbox in order for the tag to get displayed. Also there is the option (activated by default) for a “Now Playing” string and a Unicode note char to appear in front of the selected pattern. (Depending on the computer the note may appear as a square).

<Artist> – <Title> [<Album> (<Year>)]

The plugin uses the Skype4Com Library in order to communicate with Skype. It is has been tested to work with Skype v5.3.0.111.

The plugin consists of two dll files,  mb_skypenp.dll and Interop.SKYPE4COMLib.dll, the installation process is pretty simple, you simply must extract the two files in the Plugins folder inside the MusicBee Installation directory (There is a possibility that there will be no Plugins folder, in that case you will have to create it).

If you installed it at the default folder it is:
“C:\Program Files\MusicBee\Plugins” if you are running 32 bit Windows, or
“C:\Program Files(x86)\MusicBee\Plugins” if you are running 64 bit Windows.

After this you have to start MusicBee, and go to Edit->Preferences. Then in the Preferences window you have to click on “Plugins” and then you have to click the “Enable” button under the “skype: now playing”, to enable the plugin.

After that, if Skype is running you will have to Allow MusicBee to access Skype, in order to change the mood to the currently playing track.

You can report any issues or suggest some changes, either here or in the related topic in MusicBee Forum

For download links and information check the dedicated Plugin Page

Xbutton navigation, in integrated browser with c#

I have been trying for a while to find a way with the application I am developing to navigate Forward or Back using only the xbuttons (4th and 5th button of a 5 button mouse) with the integrated browser. After spending some time trying various things I found a solution posted in one of the msdn sites… unfortunately I don’t remember the URL to link to the site. The original code was in Visual Basic.

Here is the MessageFilter class responsible for the MessageFilter instance that handles the WM_XBUTTONDOWN message.

using System;
using System.Windows.Forms;

public class MessageFilter : IMessageFilter
{
 const int WM_XBUTTONDOWN = 0x020B;
 const int MK_XBUTTON1 = 65568;
 const int MK_XBUTTON2 = 131136;

 private Form _form;
 private EventHandler _backevent;
 private EventHandler _forwardevent;

 /// <summary>
 /// Initializes a new instance of the <see cref="MessageFilter"/> class.
 /// </summary>
 /// <param name="f">The form.</param>
 /// <param name="backevent">The backevent.</param>
 /// <param name="forwardevent">The forwardevent.</param>
 public MessageFilter(WebForm f, ref EventHandler backevent, ref EventHandler forwardevent)
 {
  _form = f;
  _backevent = backevent;
  _forwardevent = forwardevent;
 }

 /// <summary>
 /// Filters out a message before it is dispatched.
 /// </summary>
 /// <param name="m">The message to be dispatched. You cannot modify this message.</param>
 /// <returns>
 /// true to filter the message and stop it from being dispatched; false to allow the message to continue to the next filter or control.
 /// </returns>
 public bool PreFilterMessage(ref Message m)
 {
  bool bHandled = false;

  if (m.Msg == WM_XBUTTONDOWN)
  {
   int w = m.WParam.ToInt32();
   if (w == MK_XBUTTON1)
   {
    _backevent.Invoke(_form, EventArgs.Empty);
    bHandled = true;
   }
   else if (w == MK_XBUTTON2)
   {
    _forwardevent.Invoke(_form, EventArgs.Empty);
    bHandled = true;
   }
  }
 return bHandled;
 }
}

Furthermore you also have to add the following to the code of the form of the browser element:

In the constructor of the form after the call of the InitializeComponent(); method you have to create some Event Handlers for the following events:

this.HandleCreated += new EventHandler(webForm_HandleCreated);
this.HandleDestroyed += new EventHandler(webForm_HandleDestroyed);
this.Activated += new EventHandler(webForm_Activated);
this.Deactivate += new EventHandler(webForm_Deactivate);

And here are the Event Handle methods:

private void webForm_HandleCreated(object sender, EventArgs e)
 {
  EventHandler backevent = new EventHandler(backToolStripButton_Click);
  EventHandler forwardevent = new EventHandler(forwardToolStripButton_Click);
  _mbfilter = new MessageFilter(this, ref backevent, ref forwardevent);
 }
 private void webForm_HandleDestroyed(object sender, EventArgs e)
 {
  _mbfilter = null;
 }
 private void webForm_Activated(object sender, EventArgs e)
 {
  Application.AddMessageFilter(_mbfilter);
 }

 private void webForm_Deactivate(object sender, EventArgs e)
 {
  Application.RemoveMessageFilter(_mbfilter);
 }

For the backward and forward EventHandlers, the EventHandlers of the forward and backward buttons are used.

private void backToolStripButton_Click(object sender, EventArgs e)
 {
  if (geckoReader.CanGoBack)
   geckoReader.GoBack();
 }

private void forwardToolStripButton_Click(object sender, EventArgs e)
{
 if (geckoReader.CanGoForward)
  geckoReader.GoForward();
}

geckoReader is an instance of the GeckoFX gecko c# wrapper.

iPod scrobbling and missing scrobbles

Since the time I got my 160GB iPod classic I started scrobbling, sending all the songs played while on move to my last.fm profile. However since the beginning I had an issue once in while, or many times in the row, when I was syncing iPod with iTunes all my plays where missing. I tried various solutions, one part was avoiding iTunes and windows all over and scrobbling with a linux virtual machine, through the linux version of the last.fm player. Still it seems that the problem persisted.

After a while I discovered that the iPod actually kept play counts and last played dates, but some how iTunes or the last.fm player actually failed to recognize them and they where deleted during the sync process. The solution was accidentally found through the usage of MusicBee. Since the play counts are stored in the iPod there must be probably some inconsistency in the iPod DB that causes the issue. So a workaround is to play a track from the iPod music library with MusicBee, this seems to fix the issue, because afterwards the linux last.fm player gets every single played track in the list with the tracks to be scrobbled.